Esther
Quest Developer
- Guildcard
- 42004406
Hello there! Have a passion for PSO? Have you wanted to make quests for PSO? If you do, then look no further than here! There are several guides out there on how to pick up on Qedit, but the program is so expansive that covering everything is a tedious task. Most people that pick up guides put Qedit back down and say they couldn't do it for xyz reason. SO WITH THAT...I bring forth this exhaustive guide on everything you need to know about the program to make quests. This entire thread will be broken down into chapters in the form of Spoilers. This way, you can save time on scrolling.
Before you even get started, you will need to get qedit. You can obtain it here (It's safe, don't worry). Once you obtain the .ZIP, you will extract it somewhere on your PC. Enclosed within this file you will see the following contents:
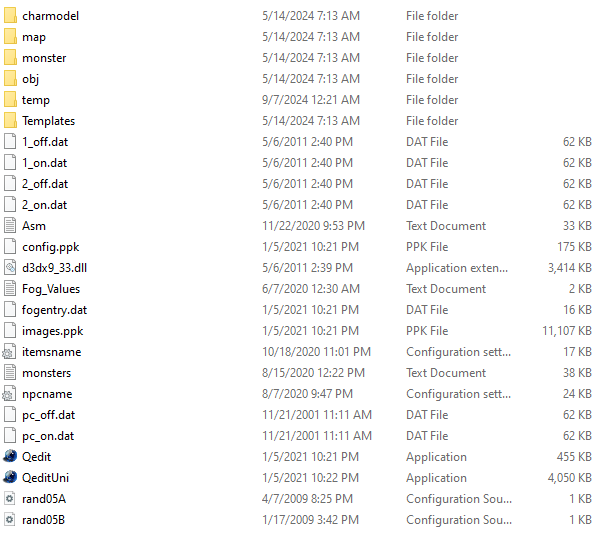
When you open Qedit, be SURE that you use the QeditUni program, and NOT the base Qedit one. Base Qedit lacks some QoL that the QeditUni has. It also has a frightening risk of freezing up your computer in the 3D viewer via spam dispensing errors.
Now that you have Qedit installed, let's get into some chapters and make a Quest Developer out of you!
Post 1/???
This post has maxed out on attachments and will continue chapters on a separate post.
Before you even get started, you will need to get qedit. You can obtain it here (It's safe, don't worry). Once you obtain the .ZIP, you will extract it somewhere on your PC. Enclosed within this file you will see the following contents:

When you open Qedit, be SURE that you use the QeditUni program, and NOT the base Qedit one. Base Qedit lacks some QoL that the QeditUni has. It also has a frightening risk of freezing up your computer in the 3D viewer via spam dispensing errors.
Now that you have Qedit installed, let's get into some chapters and make a Quest Developer out of you!
When you first open up QeditUni, you will be greeted with this window:
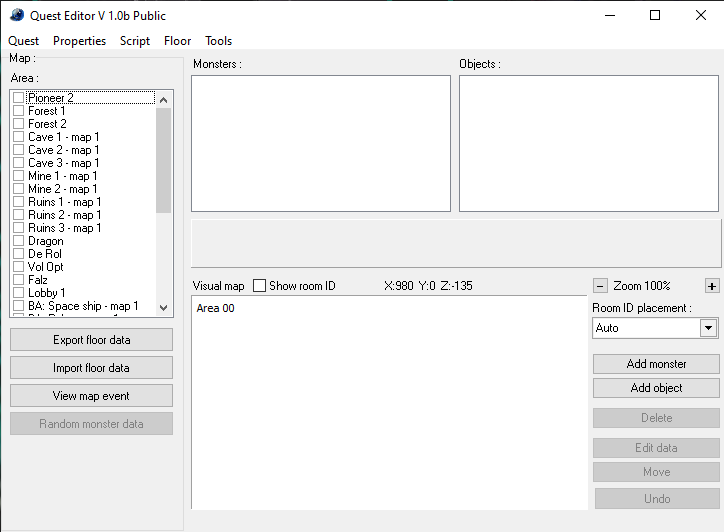
You can change the size of the window or maximize it. I personally enlarge it a bit to only a portion of my display as I like to have other pieces of Qedit also present on the same screen. Let's focus on the tool bar on the top.
Clicking "Quest" will drop down the following menu:
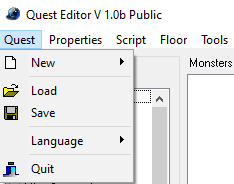
New - Starts a new quest project. You can select whichever episode from there:
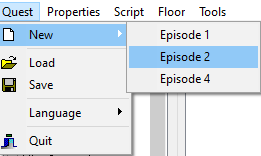
By clicking "Episode 2" you will notice the area list on the left change.:
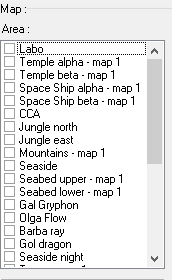
^ This list is now listing all of Episode 2. Compare to the earlier image where Episode 1 was present upon opening the program.
When you Save a quest project in the "Quest" menu in Qedit, pay attention to which format it is being saved in. Since this guide will be directed at Blue Burst, that is what we will save the file as:
This format is WRONG for Blue Burst (What Ephinea is):

This format is CORRECT for Blue Burst (What Ephinea is):

If you happen to save your Quest Project in the wrong format, do not stress it. You can just resave it as the correct format and it'll adjust itself.

You can change the size of the window or maximize it. I personally enlarge it a bit to only a portion of my display as I like to have other pieces of Qedit also present on the same screen. Let's focus on the tool bar on the top.
Clicking "Quest" will drop down the following menu:

New - Starts a new quest project. You can select whichever episode from there:

By clicking "Episode 2" you will notice the area list on the left change.:

^ This list is now listing all of Episode 2. Compare to the earlier image where Episode 1 was present upon opening the program.
When you Save a quest project in the "Quest" menu in Qedit, pay attention to which format it is being saved in. Since this guide will be directed at Blue Burst, that is what we will save the file as:
This format is WRONG for Blue Burst (What Ephinea is):

This format is CORRECT for Blue Burst (What Ephinea is):

If you happen to save your Quest Project in the wrong format, do not stress it. You can just resave it as the correct format and it'll adjust itself.
By clicking "Properties in the Tool Bar you will see this drop down menu:
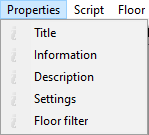
We will target the first four (4) items in this menu as they are you will want to make yourself familiar with. They are relatively self serving and easy to understand.
Title - The name of your quest. The Quest File Name is NOT what is going to show up in-game in the quest selection. The title in Qedit is what will be displayed.
Information - The short snip-it description of your quest along with other info such as quest author credits, version numbers, etc.
Description - The longer description that you see when picking a quest.
Settings - Where you toggle the language and Quest Number. The language setting is irrelevant on Ephinea as quest files on Ephinea are labeled to their proper language.
For Quest Numbers in particular, you will need to be allotted a range of numbers that are unused. A random example would be if a quest called "Sunny Days" had the number 1455, its file name would be Quest1455_e and/or Quest1455_j (English and Japanese quest file counterparts). You would not submit the quest literally titled Sunny Days on Ephinea.
The "Title" Window:

The "Information" Window:
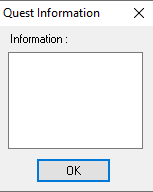
With the Information Window, you will need to press Enter/Return near the textbox boundary to wrap the text yourself. Be sure to do this neatly or the text in the box will look choppy and ugly.
The "Description" Window:
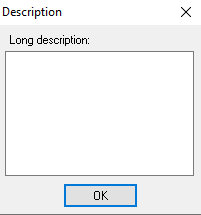
Similar to the Information Window, the Description Window will also need to be manually wrapped via Enter/Return. Be mindful of how long you let lines run on inside the box.
The "Settings" Window:
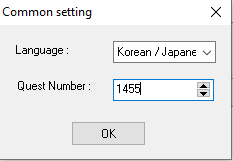
The 1455 mentioned earlier goes here.
When you have everything written out and good to go, save the quest project!

^ This is how you would name the file that you submit to staff for testing/uploading (Don't actually use 1455 as your number unless you can confirm that it's unused).

We will target the first four (4) items in this menu as they are you will want to make yourself familiar with. They are relatively self serving and easy to understand.
Title - The name of your quest. The Quest File Name is NOT what is going to show up in-game in the quest selection. The title in Qedit is what will be displayed.
Information - The short snip-it description of your quest along with other info such as quest author credits, version numbers, etc.
Description - The longer description that you see when picking a quest.
Settings - Where you toggle the language and Quest Number. The language setting is irrelevant on Ephinea as quest files on Ephinea are labeled to their proper language.
For Quest Numbers in particular, you will need to be allotted a range of numbers that are unused. A random example would be if a quest called "Sunny Days" had the number 1455, its file name would be Quest1455_e and/or Quest1455_j (English and Japanese quest file counterparts). You would not submit the quest literally titled Sunny Days on Ephinea.
The "Title" Window:

The "Information" Window:

With the Information Window, you will need to press Enter/Return near the textbox boundary to wrap the text yourself. Be sure to do this neatly or the text in the box will look choppy and ugly.
The "Description" Window:

Similar to the Information Window, the Description Window will also need to be manually wrapped via Enter/Return. Be mindful of how long you let lines run on inside the box.
The "Settings" Window:

The 1455 mentioned earlier goes here.
When you have everything written out and good to go, save the quest project!

^ This is how you would name the file that you submit to staff for testing/uploading (Don't actually use 1455 as your number unless you can confirm that it's unused).
HERE WE GO. THIS IS THE FUN PART!!!
This is probably the number one thing that turns people away from Quest Development. It is extremely daunting to look at (Especially if you've looked at the script of other quests). However, the truth about this script is that you don't actually need all that much in it to make a functional quest. We'll go through common OPcodes and then some within this chapter. In your Tool Bar, you will see a "Script" tab.
This drop down menu here:
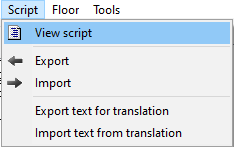
You can reveal the Script by clicking "View Script" and you will get a window that looks like this:
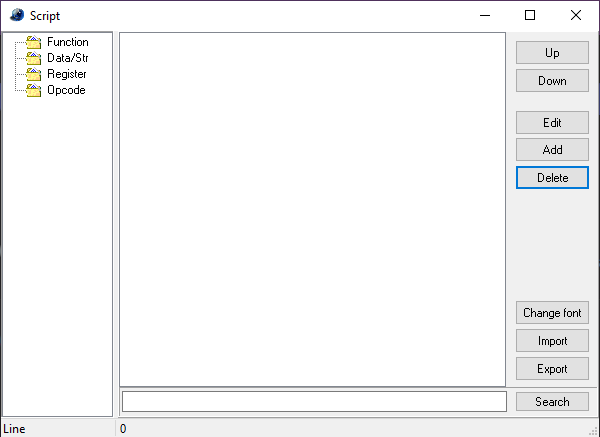
A clean Script window without any OPcodes. When first starting out, you can have Qedit autofill some initial lines for you such as: The Episode, and the areas you select to be in your quest. By going into the "Quest" tab again and picking an Episode, Qedit will automatically spit in the following lines for you (Using Episode 2 again for this example):
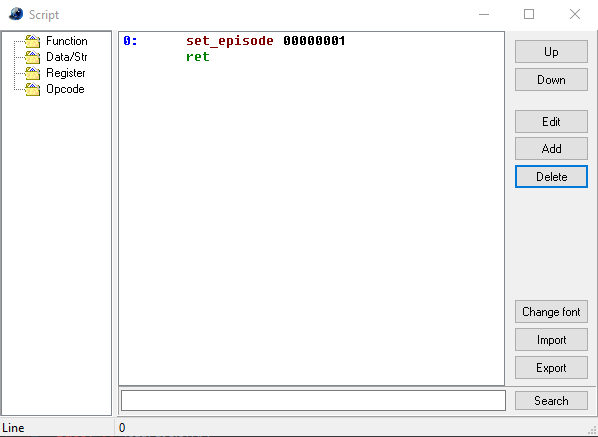
Note that Episode 1 does not dispense this OPcode into the script for you. If you put it in yourself, you would set it to zero (0).
Now lets put some areas into the script. Check the boxes of any areas you want to use first. Then, right click the areas and you will see map variations for those areas! Be sure that you click the area first before right clicking it to open the variation menu.
Like so:
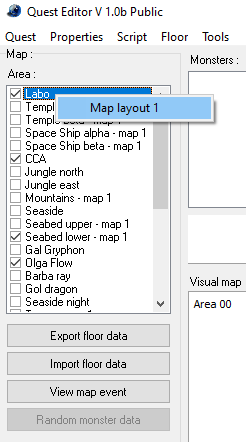
As the Lab only has one variation of map to it, you will only see the singular option given. Pick a variation of each selected area and watch the script autofill for you:
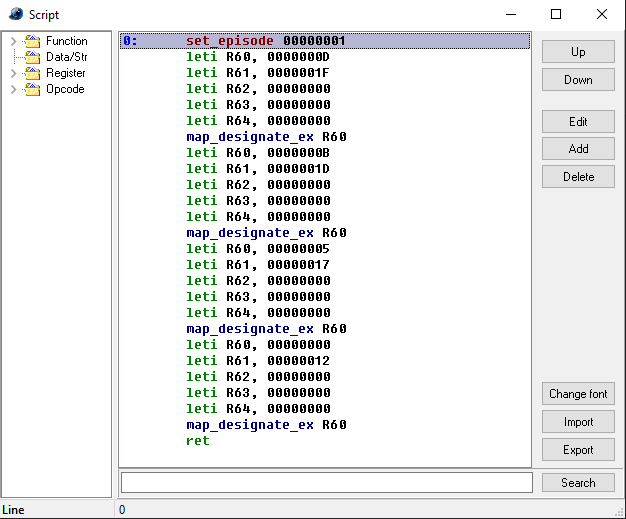
After autofill portion is over, I took the set_episode OPcode and bumped it to the top and set it to Function 0 (The blue number seen to the left of the OPcode). To move an OPcode up or down, you click on it, and then click either the "Up" or "Down" button. Once you click a button once, you can repeatedly mash enter/return to continuously move it where it you want it. To edit an OPcode, you can either click one and press "Edit" or double click an OPcode of choice.
When you add/edit an OPcode, the following window will show up:
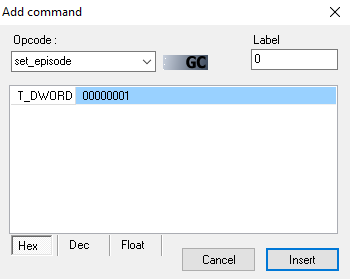
In this image I've chosen to Edit set_episode. In it, you'll see that it says "GC" next to the OPcode dropdown area. This means that it is an OPcode that debuted on V3. To expand on this a little, you can tell which version an OPcode debuted in by their color (Most of them).
Green - V1 OPcodes (DC)
Blue - V2 OPcodes (DC, PC)
Red - V3 OPcodes (GC, Xbox)
Purple - V4 OPcodes (BB)
Earlier debuted OPcodes will function on later versions of the game, but you CANNOT go in reverse or the client will crash.
Now, clicking on the OPcode dropdown section will open up this menu for you:
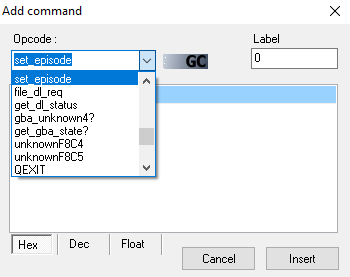
You can type in the space and the list will autofill in OPcodes for you as you type. You do NOT have to scroll through the entire list each and every time. Once you've used a few OPcodes and get familiar with the program, you will start to type out regularly used codes quite frequently. There are a few that you will use so often that you'll never forget them.
To the right side of the window is the label number (Or function number). Since I went to Edit set_episode which is set to 0, the label there is 0. Zero (0) is the ONLY function that is reserved and cannot be used for something it isn't meant for. It is reserved for being read the moment the quest starts. Whatever is in that function will be read and this is where a number of very common OPcodes are used:
set_episode
map_designate_ex
get_slotnumber
set_qt_success and/or set_qt_failure
set_mainwarp
set_floor_handler
get_difflvl2
Some of these OPcodes are used with Reserved Registers. Registers are basically containers that you put info into. You can tell OPcodes what to do with them, essentially. Some of these Registers are reserved and can't be used for other purposes. These Reserved Registers can be found here. set_floor_handler and set_mainwarp are both using Area Number listing in their examples. This is NOT necessary and using Floor Number works just fine!
To define both these Number Listings, they are as follows:
Floor Number: A list of each of the maps starting from zero (0) in each Episode. Zero (0) is always Pioneer 2/Lab and the list runs on to whichever area is last in that Episode.
Area Number: A list of each of the maps starting from Episode 1's Pioneer 2 being Zero (0) and runs nonstop through all the Episodes.
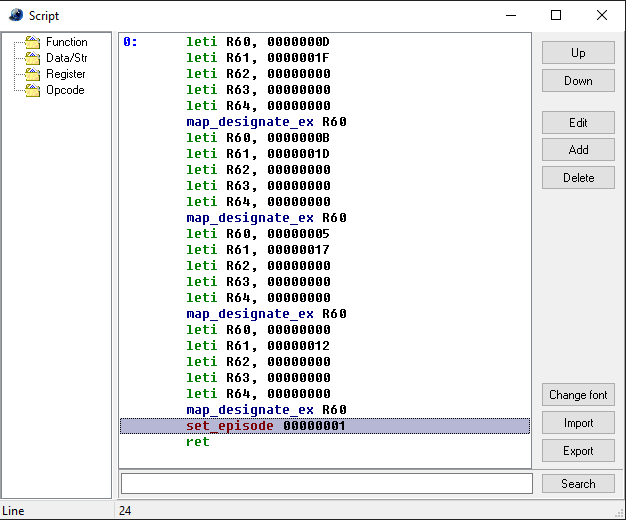
Once you enter these OPcodes into Function Zero (0), you will end it with a ret OPcode (Which is already going to be there as Qedit's autofill puts it there). Your progress should now look like this:
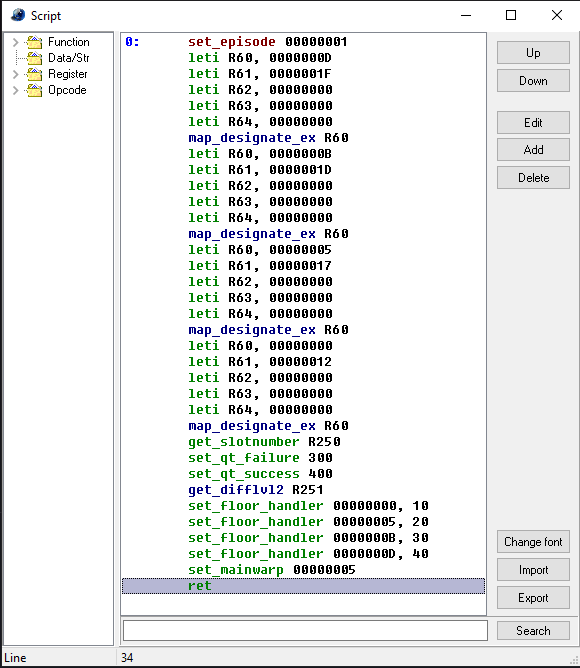
To read this:
1) Function Zero (0) starts at quest launch. It starts by declaring the quest is in Episode 2 (set_episode 00000001).
2) A string of Registers are used here to prepare the map_designate_ex OPcode:
Leti Register 60 declares the Floor ID (Floor Number) is 13, Leti Register 61 declares the Map ID (Area Number) is 31, Leti Register 62 works in tandem with Register 64 and are both always preferred to stay at Zero (0), Leti Register 63 declares that the Map Variation is Zero (0).
--> Floor Number 13, Area Number 31, Map Variation 0 = Olga Flow Arena
The rest of the map_designate_ex codes are all the same thing for the other selected maps.
3) Register 250 is reserved for get_slotnumber which is what tells clients apart.
4) set_qt_failure is to be used with Register 253. If some condition in the quest is met that causes this Register to equal 1, the guild lady will give the failure message and send all players who interact to the lobby. When speaking to the guild lady, she will say what is set in Function 300.
5) set_qt_success is to be used with Register 255. If some condition in the quest is met that causes this Register to equal 1, the guild lady will give the completion message followed by a Meseta Reward. This message and Meseta reward is what is set in Function 400.
6) Upon room creation, get_difflvl2 will immediately set the proper Register depending on the difficulty chosen. These Registers range from 0-3 and can be used to manipulate some things in a quest.
7) All of the Floor Handlers are tied to the maps you have selected. In this example we have: Lab, CCA, Seabed Lower, and Olga Arena selected.
--> Upon entering the Lab (Floor 0), run Function 10.
--> Upon entering CCA (Floor 5), run Function 20.
--> Upon entering Seabed Lower (Floor 11), run Function 30.
--> Upon entering Olga Arena (Floor 13), run Function 40.
Floor Handlers are extremely useful for events you put in your quest. Things such as switches, threaded spawns, and other miscellaneous conditions are tied to these. This is also where your intro cutscene takes place where the quest giver gives their mission details (Where the Skip Dialogue appears).
8) The set_mainwarp is what causes the big blue teleporter in the lab to work and show which area you are going to. Every map you then visit during the quest will automatically save as well. Being set to 00000005 will make it so the teleporter will display CCA and warp players there. Upon reaching Seabed Lower, the Teleporter will proceed to add it on its own.
9) The script proceeds to end with a small ret OPcode. This tiny little thing must be added at the end of every Function where you want it to terminate. If you do not put a ret OPcode at the end of a Function, the script will continue to read on and on until it does reach one. This can cause a number of problems in your quest. If the script reaches the bottom and still doesn't meet a ret OPcode, it will bottom out and crash your client.
OKAY...So now that we got some lines of scripting in, let's see how some of them actually work.
get_slotnumber:
Ever wonder how you make it so everyone has to talk to a console to start some quests? Or how that one warp panel in PW2 warps each player to a different quadrant of the laser fences on that one island? Or how if you make contact with any of the pesky particles in Scarlet Realm #4 it affects just that Player? Not using this OPcode's magical powers, it would make it so that only one person has to talk to a console and the quest starts abruptly and not properly prepared. In PW2, every player would appear in the same spot, and in the case of Scarlet Realm #4, if one person touched a particle, it would literally affect the entire party without this OPcode's power. With get_slotnumber you have the ability to split what goes on between the clients of each player in a party.
switch_call
switch_jmp
The two (2) OPcodes above are what can be used to split up clients. The way these OPcodes work is they take a Register, then generate a series of targeted Functions depending on what Register is being used. If some random Register like R100 is tied to picking from a list of 3 different doors to open, it'd read like this:
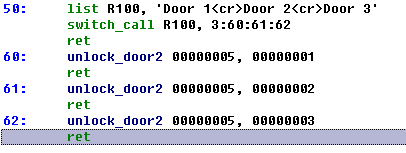
1) You speak to a NPC in CCA tied to Function 50 (We'll cover NPCs and Consoles in another chapter):
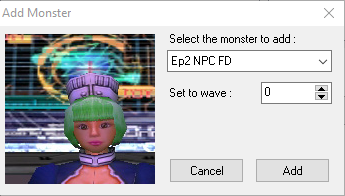
^ This is an available NPC in CCA so we'll use her. Setting her to Wave 0 will cause her to spawn upon entry to the Map without triggering (NEVER set Monster/Enemy waves to 0).
So you talk to her and she generates a list for you tied to Register 100. You'll read that each door option is divided by a <cr> without any spaces. This is a Carriage Return and will serve as differing options when used in a List OPcode. In the switch_call OPcode, you will repeat the same Register tied to the List so the script will carry the info of Register 100. Then, you add Functions to jump to separated by Colons. As we are looking at Three (3) doors, we have three Functions after the Register.
2) Selecting "Door 1" will Switch_Call to Function 60. Then "Door 2" will jump to Function 61, etc.
3) Unlock_Door2 OPcodes will then unlock a selected door in a specified Map. This particular OPcode also sends a packet to let other clients know which doors are unlocked. So if Player 3 spoke to the NPC and selected "Door 3", it would unlock that door for all other clients even though one player did it.
---> Function 60 looks at CCA (Floor 5) and unlocks Door #1 in it.
---> Function 61 looks at CCA (Floor 5) and unlocks Door #2 in it.
---> Function 62 looks at CCA (Floor 5) and unlocks Door #3 in it.
Now, if unlock_door2 was replaced with the switch_on OPcode, only one client will see a door unlock.
This topic can resume in the chapter covering NPCs and Consoles.
set_qt_failure:
A much more simpler OPcode to use versus the potentially expansive get_slotnumber. Let's say that a clear condition in this quest is to press a number of switches before defeating Olga Flow. If you don't press them all, you can make the script check for them and then set the failure Register 253 to One (1). You then can set a message the NPC can say before getting booted back to the lobby. If you do not put in a Function for the Failure Flag, the guild lady will simply say the usual speech of "Was it more difficult than you imagined?" etc etc etc. For neatness sake, most people just let her say her usual line by leaving the function out. By putting one in yourself, it'll replace her usual lines with your custom ones.
set_qt_success:
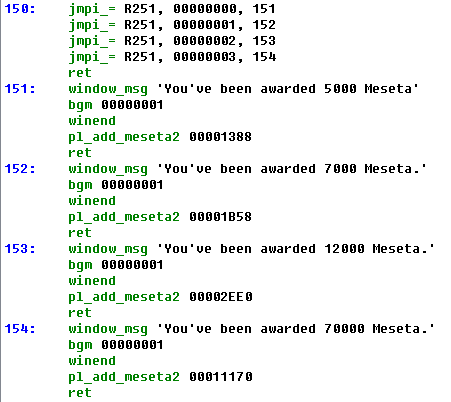
When the Reserved Register for quest completion (R255) is set to one (1), it'll cause the guild lady to provide players with the Meseta Rewards before leaving to the lobby. These rewards are scaled by difficulty by using get_difflvl2, and pathing the script to ensuring the correct Meseta Reward is given. You can refer to the following image on how this works:
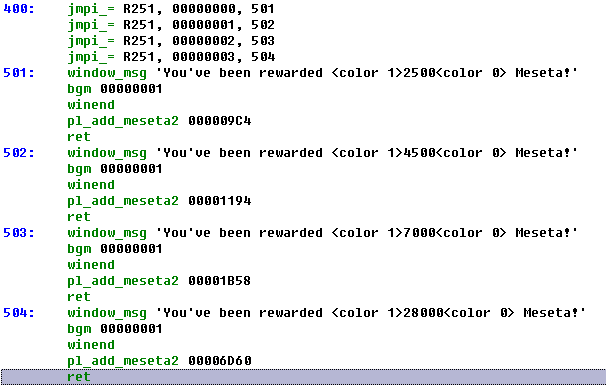
Reserved Register 251 for get_difflvl2 which ranges from 0-3 depending on difficulty. set_qt_success in our example is tied to Function 400. As you can see in the image, Function 400 checks which Function to jump depending on the Register. The jmpi_= OPcode is likely going to be one of the most common ones you will use on your Qedit journey. It checks if a Register is set to a specific number/value. If it isn't, it'll ignore it and keep reading down. This is a very commonly used OPcode for looping checks until a Register IS equal to a value. Once it is, it'll send the script over to a specified Function.
In the image's case, R251 set to Zero (0) would be Normal Difficulty. The script will see that and jump to Function 501.
set_floor_handler:
A very important Opcode that where you will encounter a lot of thread_stg and/or thread OPcodes. If you've looked at various quest scripts on Qedit and saw any of them, chances are very high that they are positioned in a Floor Handler to some map of the quest. Something as simple as needing to press two (2) switches to open one laser fence is done in a Floor Handler's thread_stg. If you've been around for a little while, I am SURE that you've heard people use the term "Threaded Spawns" before at some point or another. If you're unfamiliar, Threaded Spawns are when two (2) or more spawns are running at the same time. Upon clearing them, you use thread_stg OPcodes to check if they are all cleared, hence the name Threaded Spawns. A fair number of areas do not actually require the use of these OPcodes due to the nature of their 4-button door's functionality (Cave, Mine, Ruins, Temple, Spaceship, CCA/Tower, and Seabed). However, if you are dealing with a single switch door, a laser fence, or a clear condition, you will need to use threading.
thread_stg - More commonly used. Will only loop checks if you're on the floor this thread is checking and will cease when warping to another area.
thread - Not as commonly used. Will loop checks regardless of what floor/map you are on. It'll even loop during loading screens. This OPcode is perfect to use for things like timers and clear conditions. If these things are done with thread_stg then the timer will vanish when not on the floor it's being handled on, and the clear condition will not occur for a player that isn't in the area the clear check is in when the final spawn is slain. They'll only get it when warping to that floor after it's been cleared. When using thread as a clear condition, it is best to place it somewhere in Function 0.
Example of CCA's Floor Handler threading Switch #8's check:
Leti Register 60 = 5 (Floor Number of CCA)
Leti Register 61 = 8 (Switch Number to check each loop)
if_switch_pressed R60 = Takes info from starting string at R60 to see if it's true.
jmpi_= Register 62 = Checks the switch. If not pressed the Register remains Zero (0) and it jumps back to 21 to check repeatedly. If pressed, R62 sets to One (1) and passes the check.
set Register 255 makes it so R255 equals 1 (1). This is the quest completion Register.
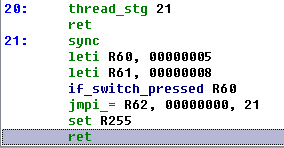
^ CCA Floor Handler is tied to Function 20. Warping to CCA runs this function.
thread_stg looks at Function 21 and begins to run it while the main script continues. When using either thread OPcode, it's generally a good practice to start the threaded function with a sync OPcode. Not doing so may cause crashes to occur depending on what you're doing.
So, up to this point in scripting we have gone over the essential pieces of what your Function 0 should look like, as well as what they do. There is a considerable amount of branching you can do with some of the OPcodes, but you now at least now know the nucleus of what they do. Once you get Function 0 done, you can move on to making the Functions for each Map's Floor Handler. When starting them out, I personally just use a ret OPcode on each one until I have things to put in them. Then, create your Quest Success template for Meseta rewards.
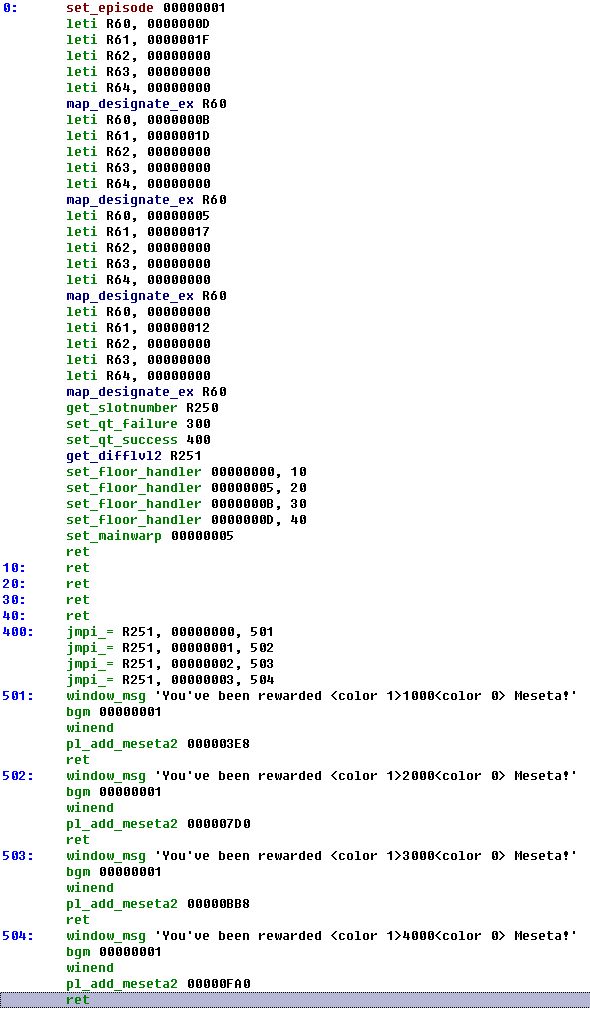
^ When making a quest, this is a decent template to use. All four (4) Floor Handlers are labeled (10, 20, 30, and 40) with ret OPcodes that can later be edited and expanded upon. Function 300 was left out as having a custom message for Quest Failure is not commonly done. Function 400 being a Quest Success uses the Reserved Register 251 (Again, used for get_difflvl2) so the game can decide which reward to give the player(s).
This is probably the number one thing that turns people away from Quest Development. It is extremely daunting to look at (Especially if you've looked at the script of other quests). However, the truth about this script is that you don't actually need all that much in it to make a functional quest. We'll go through common OPcodes and then some within this chapter. In your Tool Bar, you will see a "Script" tab.
This drop down menu here:

You can reveal the Script by clicking "View Script" and you will get a window that looks like this:

A clean Script window without any OPcodes. When first starting out, you can have Qedit autofill some initial lines for you such as: The Episode, and the areas you select to be in your quest. By going into the "Quest" tab again and picking an Episode, Qedit will automatically spit in the following lines for you (Using Episode 2 again for this example):

Note that Episode 1 does not dispense this OPcode into the script for you. If you put it in yourself, you would set it to zero (0).
Now lets put some areas into the script. Check the boxes of any areas you want to use first. Then, right click the areas and you will see map variations for those areas! Be sure that you click the area first before right clicking it to open the variation menu.
Like so:

As the Lab only has one variation of map to it, you will only see the singular option given. Pick a variation of each selected area and watch the script autofill for you:

After autofill portion is over, I took the set_episode OPcode and bumped it to the top and set it to Function 0 (The blue number seen to the left of the OPcode). To move an OPcode up or down, you click on it, and then click either the "Up" or "Down" button. Once you click a button once, you can repeatedly mash enter/return to continuously move it where it you want it. To edit an OPcode, you can either click one and press "Edit" or double click an OPcode of choice.
When you add/edit an OPcode, the following window will show up:

In this image I've chosen to Edit set_episode. In it, you'll see that it says "GC" next to the OPcode dropdown area. This means that it is an OPcode that debuted on V3. To expand on this a little, you can tell which version an OPcode debuted in by their color (Most of them).
Green - V1 OPcodes (DC)
Blue - V2 OPcodes (DC, PC)
Red - V3 OPcodes (GC, Xbox)
Purple - V4 OPcodes (BB)
Earlier debuted OPcodes will function on later versions of the game, but you CANNOT go in reverse or the client will crash.
Now, clicking on the OPcode dropdown section will open up this menu for you:

You can type in the space and the list will autofill in OPcodes for you as you type. You do NOT have to scroll through the entire list each and every time. Once you've used a few OPcodes and get familiar with the program, you will start to type out regularly used codes quite frequently. There are a few that you will use so often that you'll never forget them.
To the right side of the window is the label number (Or function number). Since I went to Edit set_episode which is set to 0, the label there is 0. Zero (0) is the ONLY function that is reserved and cannot be used for something it isn't meant for. It is reserved for being read the moment the quest starts. Whatever is in that function will be read and this is where a number of very common OPcodes are used:
set_episode
map_designate_ex
get_slotnumber
set_qt_success and/or set_qt_failure
set_mainwarp
set_floor_handler
get_difflvl2
Some of these OPcodes are used with Reserved Registers. Registers are basically containers that you put info into. You can tell OPcodes what to do with them, essentially. Some of these Registers are reserved and can't be used for other purposes. These Reserved Registers can be found here. set_floor_handler and set_mainwarp are both using Area Number listing in their examples. This is NOT necessary and using Floor Number works just fine!
To define both these Number Listings, they are as follows:
Floor Number: A list of each of the maps starting from zero (0) in each Episode. Zero (0) is always Pioneer 2/Lab and the list runs on to whichever area is last in that Episode.
Area Number: A list of each of the maps starting from Episode 1's Pioneer 2 being Zero (0) and runs nonstop through all the Episodes.
Once you enter these OPcodes into Function Zero (0), you will end it with a ret OPcode (Which is already going to be there as Qedit's autofill puts it there). Your progress should now look like this:

To read this:
1) Function Zero (0) starts at quest launch. It starts by declaring the quest is in Episode 2 (set_episode 00000001).
2) A string of Registers are used here to prepare the map_designate_ex OPcode:
Leti Register 60 declares the Floor ID (Floor Number) is 13, Leti Register 61 declares the Map ID (Area Number) is 31, Leti Register 62 works in tandem with Register 64 and are both always preferred to stay at Zero (0), Leti Register 63 declares that the Map Variation is Zero (0).
--> Floor Number 13, Area Number 31, Map Variation 0 = Olga Flow Arena
The rest of the map_designate_ex codes are all the same thing for the other selected maps.
3) Register 250 is reserved for get_slotnumber which is what tells clients apart.
4) set_qt_failure is to be used with Register 253. If some condition in the quest is met that causes this Register to equal 1, the guild lady will give the failure message and send all players who interact to the lobby. When speaking to the guild lady, she will say what is set in Function 300.
5) set_qt_success is to be used with Register 255. If some condition in the quest is met that causes this Register to equal 1, the guild lady will give the completion message followed by a Meseta Reward. This message and Meseta reward is what is set in Function 400.
6) Upon room creation, get_difflvl2 will immediately set the proper Register depending on the difficulty chosen. These Registers range from 0-3 and can be used to manipulate some things in a quest.
7) All of the Floor Handlers are tied to the maps you have selected. In this example we have: Lab, CCA, Seabed Lower, and Olga Arena selected.
--> Upon entering the Lab (Floor 0), run Function 10.
--> Upon entering CCA (Floor 5), run Function 20.
--> Upon entering Seabed Lower (Floor 11), run Function 30.
--> Upon entering Olga Arena (Floor 13), run Function 40.
Floor Handlers are extremely useful for events you put in your quest. Things such as switches, threaded spawns, and other miscellaneous conditions are tied to these. This is also where your intro cutscene takes place where the quest giver gives their mission details (Where the Skip Dialogue appears).
8) The set_mainwarp is what causes the big blue teleporter in the lab to work and show which area you are going to. Every map you then visit during the quest will automatically save as well. Being set to 00000005 will make it so the teleporter will display CCA and warp players there. Upon reaching Seabed Lower, the Teleporter will proceed to add it on its own.
9) The script proceeds to end with a small ret OPcode. This tiny little thing must be added at the end of every Function where you want it to terminate. If you do not put a ret OPcode at the end of a Function, the script will continue to read on and on until it does reach one. This can cause a number of problems in your quest. If the script reaches the bottom and still doesn't meet a ret OPcode, it will bottom out and crash your client.
OKAY...So now that we got some lines of scripting in, let's see how some of them actually work.
get_slotnumber:
Ever wonder how you make it so everyone has to talk to a console to start some quests? Or how that one warp panel in PW2 warps each player to a different quadrant of the laser fences on that one island? Or how if you make contact with any of the pesky particles in Scarlet Realm #4 it affects just that Player? Not using this OPcode's magical powers, it would make it so that only one person has to talk to a console and the quest starts abruptly and not properly prepared. In PW2, every player would appear in the same spot, and in the case of Scarlet Realm #4, if one person touched a particle, it would literally affect the entire party without this OPcode's power. With get_slotnumber you have the ability to split what goes on between the clients of each player in a party.
switch_call
switch_jmp
The two (2) OPcodes above are what can be used to split up clients. The way these OPcodes work is they take a Register, then generate a series of targeted Functions depending on what Register is being used. If some random Register like R100 is tied to picking from a list of 3 different doors to open, it'd read like this:

1) You speak to a NPC in CCA tied to Function 50 (We'll cover NPCs and Consoles in another chapter):

^ This is an available NPC in CCA so we'll use her. Setting her to Wave 0 will cause her to spawn upon entry to the Map without triggering (NEVER set Monster/Enemy waves to 0).
So you talk to her and she generates a list for you tied to Register 100. You'll read that each door option is divided by a <cr> without any spaces. This is a Carriage Return and will serve as differing options when used in a List OPcode. In the switch_call OPcode, you will repeat the same Register tied to the List so the script will carry the info of Register 100. Then, you add Functions to jump to separated by Colons. As we are looking at Three (3) doors, we have three Functions after the Register.
2) Selecting "Door 1" will Switch_Call to Function 60. Then "Door 2" will jump to Function 61, etc.
3) Unlock_Door2 OPcodes will then unlock a selected door in a specified Map. This particular OPcode also sends a packet to let other clients know which doors are unlocked. So if Player 3 spoke to the NPC and selected "Door 3", it would unlock that door for all other clients even though one player did it.
---> Function 60 looks at CCA (Floor 5) and unlocks Door #1 in it.
---> Function 61 looks at CCA (Floor 5) and unlocks Door #2 in it.
---> Function 62 looks at CCA (Floor 5) and unlocks Door #3 in it.
Now, if unlock_door2 was replaced with the switch_on OPcode, only one client will see a door unlock.
This topic can resume in the chapter covering NPCs and Consoles.
set_qt_failure:
A much more simpler OPcode to use versus the potentially expansive get_slotnumber. Let's say that a clear condition in this quest is to press a number of switches before defeating Olga Flow. If you don't press them all, you can make the script check for them and then set the failure Register 253 to One (1). You then can set a message the NPC can say before getting booted back to the lobby. If you do not put in a Function for the Failure Flag, the guild lady will simply say the usual speech of "Was it more difficult than you imagined?" etc etc etc. For neatness sake, most people just let her say her usual line by leaving the function out. By putting one in yourself, it'll replace her usual lines with your custom ones.
set_qt_success:
When the Reserved Register for quest completion (R255) is set to one (1), it'll cause the guild lady to provide players with the Meseta Rewards before leaving to the lobby. These rewards are scaled by difficulty by using get_difflvl2, and pathing the script to ensuring the correct Meseta Reward is given. You can refer to the following image on how this works:

Reserved Register 251 for get_difflvl2 which ranges from 0-3 depending on difficulty. set_qt_success in our example is tied to Function 400. As you can see in the image, Function 400 checks which Function to jump depending on the Register. The jmpi_= OPcode is likely going to be one of the most common ones you will use on your Qedit journey. It checks if a Register is set to a specific number/value. If it isn't, it'll ignore it and keep reading down. This is a very commonly used OPcode for looping checks until a Register IS equal to a value. Once it is, it'll send the script over to a specified Function.
In the image's case, R251 set to Zero (0) would be Normal Difficulty. The script will see that and jump to Function 501.
set_floor_handler:
A very important Opcode that where you will encounter a lot of thread_stg and/or thread OPcodes. If you've looked at various quest scripts on Qedit and saw any of them, chances are very high that they are positioned in a Floor Handler to some map of the quest. Something as simple as needing to press two (2) switches to open one laser fence is done in a Floor Handler's thread_stg. If you've been around for a little while, I am SURE that you've heard people use the term "Threaded Spawns" before at some point or another. If you're unfamiliar, Threaded Spawns are when two (2) or more spawns are running at the same time. Upon clearing them, you use thread_stg OPcodes to check if they are all cleared, hence the name Threaded Spawns. A fair number of areas do not actually require the use of these OPcodes due to the nature of their 4-button door's functionality (Cave, Mine, Ruins, Temple, Spaceship, CCA/Tower, and Seabed). However, if you are dealing with a single switch door, a laser fence, or a clear condition, you will need to use threading.
thread_stg - More commonly used. Will only loop checks if you're on the floor this thread is checking and will cease when warping to another area.
thread - Not as commonly used. Will loop checks regardless of what floor/map you are on. It'll even loop during loading screens. This OPcode is perfect to use for things like timers and clear conditions. If these things are done with thread_stg then the timer will vanish when not on the floor it's being handled on, and the clear condition will not occur for a player that isn't in the area the clear check is in when the final spawn is slain. They'll only get it when warping to that floor after it's been cleared. When using thread as a clear condition, it is best to place it somewhere in Function 0.
Example of CCA's Floor Handler threading Switch #8's check:
Leti Register 60 = 5 (Floor Number of CCA)
Leti Register 61 = 8 (Switch Number to check each loop)
if_switch_pressed R60 = Takes info from starting string at R60 to see if it's true.
jmpi_= Register 62 = Checks the switch. If not pressed the Register remains Zero (0) and it jumps back to 21 to check repeatedly. If pressed, R62 sets to One (1) and passes the check.
set Register 255 makes it so R255 equals 1 (1). This is the quest completion Register.

^ CCA Floor Handler is tied to Function 20. Warping to CCA runs this function.
thread_stg looks at Function 21 and begins to run it while the main script continues. When using either thread OPcode, it's generally a good practice to start the threaded function with a sync OPcode. Not doing so may cause crashes to occur depending on what you're doing.
So, up to this point in scripting we have gone over the essential pieces of what your Function 0 should look like, as well as what they do. There is a considerable amount of branching you can do with some of the OPcodes, but you now at least now know the nucleus of what they do. Once you get Function 0 done, you can move on to making the Functions for each Map's Floor Handler. When starting them out, I personally just use a ret OPcode on each one until I have things to put in them. Then, create your Quest Success template for Meseta rewards.

^ When making a quest, this is a decent template to use. All four (4) Floor Handlers are labeled (10, 20, 30, and 40) with ret OPcodes that can later be edited and expanded upon. Function 300 was left out as having a custom message for Quest Failure is not commonly done. Function 400 being a Quest Success uses the Reserved Register 251 (Again, used for get_difflvl2) so the game can decide which reward to give the player(s).
In this Chapter we'll actually start to place things down and learn how to move them. Firstly, it should be mentioned that when you "Add" an object/monster to the map, its marker will appear at 0, 0, 0. Click anywhere on the wireframe and the marker of that object/monster will snap straight to your cursor position.
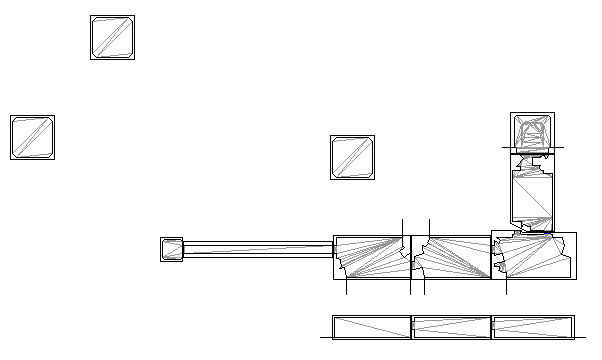
^ This is a blank wireframe of the CCA Map. We will start to place some things down on it, but it is NOT recommended to fully populate the Map with objects from scratch. Doing so not only wastes a lot of time, but also opens risks to you messing some things up or shoddily placing objects. We will cover actually starting the quest build in another chapter. The first thing you should do before placing any objects is check the box saying "Show room ID" that sits above the wireframe to the left.
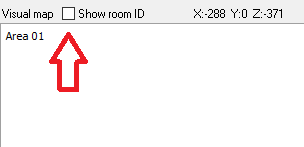
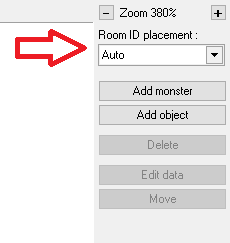
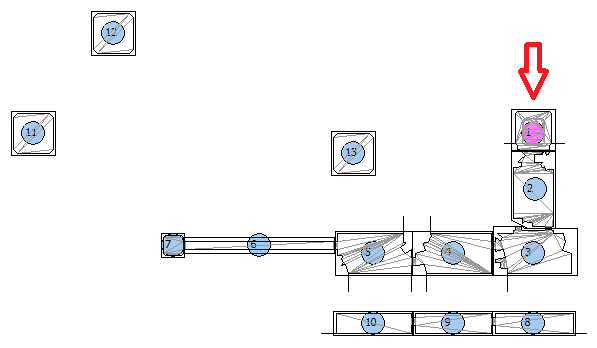
Checking this box should make all the room IDs become visible all over the Map wireframe. Then, you want to navigate to the right side of the map. You'll see a dropdown field called "Room ID placement" that will be quite helpful throughout your Qedit journey. My advice with placement is to never have it set to "Auto" at any point in time. Select the exact room you intend to work with and progress from there. The Room ID will highlight a purple color when selected. The reason I'd suggest steering clear of the Auto setting is that it can screw up your ID placements in more complex maps. It's a good habit to select the proper room each time to avoid this potentially happening to you.
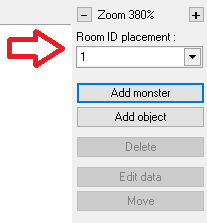
Room ID 1 is selected and shows purple in the example image below:
Now that we have the Room IDs shown and a room selected, let's start to put some things down. In the Tool Bar, you will see a tab called "Tools". You will find the 3D Viewer in it. This Viewer is immensely helpful for positioning things how you want them. You can move the view around simply by holding left click and dragging.
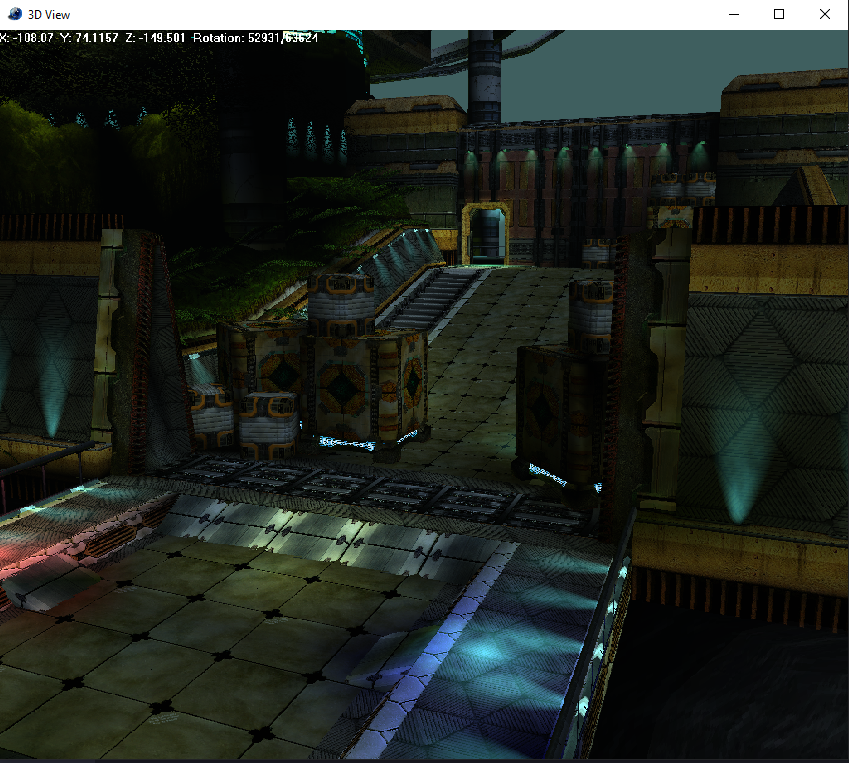
^ The 3D Viewer in Qedit.
When in the Viewer, you can move forward and back with Q & A. Pressing D will change the info in the upper left from DEC to HEX and vise versa. Pressing F will toggle off/on any fog that you have present. To move things along the X/Z Axis, you left click and hold on an object/monster, hold CTRL, and drag. To move things up and down the Y Axis, you do the same thing but while holding Shift instead of CTRL. To rotate an object on its Y-axis (The most common rotation that everything is able to do), you do the same thing as you do with moving but holding the Y key. Some objects have a Z and X Axis rotation ability. The few that have these can be rotated by holding Z or X.
Any object you are clicked and focused on in the Viewer will have this shiny light on it. In the following example, I decided to make that object a small breakable rock.
X/Z Axis movement:
Y Axis movement:
Y Axis rotation:
If you click on any object/monster you have placed in another Room ID on the Map wireframe, the 3D Viewer will instantly snap to that room for convenience:
Now let's say you want to put down a lot of the same objects/monsters. While not very present or intuitive, Qedit does have a copy/paste ability. Let's go and put down a whole lot more rocks for no reason. First, click the rock you want to copy. Next, locate the "Move" button to the right of the wireframe:
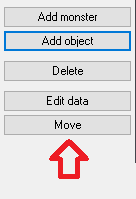
After clicking it, hold down CTRL and start to click around on the wireframe. You will see the object paste over and over again as long as CTRL is held down. After you are done pasting, be aware that you still have a Move applied after letting go of CTRL. If you click anywhere else on the wireframe, the very last object you pasted will snap over to your cursor position.
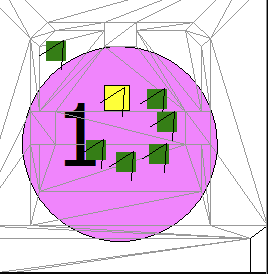
^ One outlier rock sitting away from the others because I clicked over there after pasting.
If you are deleting objects/monsters, I'd recommend closing the 3D Viewer because each deletion you make will load in the Viewer which takes up time. Additionally, the more objects/monsters you have on the map, the longer it'll take to load each deletion you make.

^ This is a blank wireframe of the CCA Map. We will start to place some things down on it, but it is NOT recommended to fully populate the Map with objects from scratch. Doing so not only wastes a lot of time, but also opens risks to you messing some things up or shoddily placing objects. We will cover actually starting the quest build in another chapter. The first thing you should do before placing any objects is check the box saying "Show room ID" that sits above the wireframe to the left.

Checking this box should make all the room IDs become visible all over the Map wireframe. Then, you want to navigate to the right side of the map. You'll see a dropdown field called "Room ID placement" that will be quite helpful throughout your Qedit journey. My advice with placement is to never have it set to "Auto" at any point in time. Select the exact room you intend to work with and progress from there. The Room ID will highlight a purple color when selected. The reason I'd suggest steering clear of the Auto setting is that it can screw up your ID placements in more complex maps. It's a good habit to select the proper room each time to avoid this potentially happening to you.

Room ID 1 is selected and shows purple in the example image below:

Now that we have the Room IDs shown and a room selected, let's start to put some things down. In the Tool Bar, you will see a tab called "Tools". You will find the 3D Viewer in it. This Viewer is immensely helpful for positioning things how you want them. You can move the view around simply by holding left click and dragging.

^ The 3D Viewer in Qedit.
When in the Viewer, you can move forward and back with Q & A. Pressing D will change the info in the upper left from DEC to HEX and vise versa. Pressing F will toggle off/on any fog that you have present. To move things along the X/Z Axis, you left click and hold on an object/monster, hold CTRL, and drag. To move things up and down the Y Axis, you do the same thing but while holding Shift instead of CTRL. To rotate an object on its Y-axis (The most common rotation that everything is able to do), you do the same thing as you do with moving but holding the Y key. Some objects have a Z and X Axis rotation ability. The few that have these can be rotated by holding Z or X.
Any object you are clicked and focused on in the Viewer will have this shiny light on it. In the following example, I decided to make that object a small breakable rock.
X/Z Axis movement:
Y Axis movement:
Y Axis rotation:
If you click on any object/monster you have placed in another Room ID on the Map wireframe, the 3D Viewer will instantly snap to that room for convenience:
Now let's say you want to put down a lot of the same objects/monsters. While not very present or intuitive, Qedit does have a copy/paste ability. Let's go and put down a whole lot more rocks for no reason. First, click the rock you want to copy. Next, locate the "Move" button to the right of the wireframe:

After clicking it, hold down CTRL and start to click around on the wireframe. You will see the object paste over and over again as long as CTRL is held down. After you are done pasting, be aware that you still have a Move applied after letting go of CTRL. If you click anywhere else on the wireframe, the very last object you pasted will snap over to your cursor position.

^ One outlier rock sitting away from the others because I clicked over there after pasting.
If you are deleting objects/monsters, I'd recommend closing the 3D Viewer because each deletion you make will load in the Viewer which takes up time. Additionally, the more objects/monsters you have on the map, the longer it'll take to load each deletion you make.
Functionally, there are only a few differences between how an NPC and a Console works. Most NPCs generally will be found on Pioneer 2/Lab, but some quests do have them in certain maps. If using an NPC, you'll be using the following OPcodes to make them say something:
message
add_msg
mesend
Step 1: Place an NPC.
Step 2: Click the NPC and click "Edit" or double click the NPC's marker and the same menu will pop up. You'll see a number of things in here but the target focus will be the "Character ID" and the "Function" parameters. For the Character ID, you want to put any number to tie to the the message OPcode. This number must be at least 100 or the NPC will perform a 'Stutter'. For the Function parameter, you want to put in the Function Number in your script that the NPC will target when spoken to.
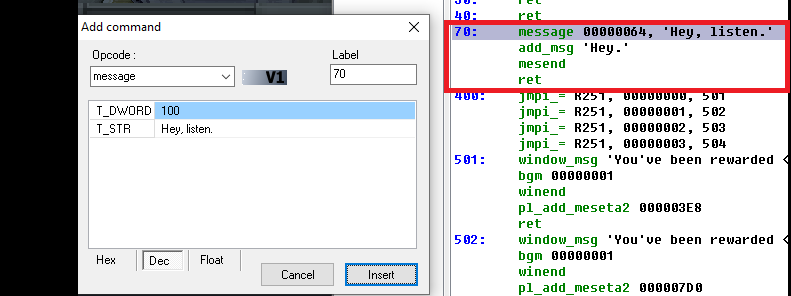
Step 3: In the Edit for the message OPcode. You can change between HEX, DEC, and Float in the OPcode command window. DEC is the easiest to follow for most. In the image below, it illustrates that the message OPcode is being used on Function 70. The first field (T_DWORD) will be the Character ID of the NPC. In this case, it's 100. The second field (T_STR) is dialogue for the NPC to say.
add_msg follows after message and serves as continuation to an NPC's dialogue. message is only used once and add_msg will continue onward until mesend closes the dialogue box. If sentences run on for too long, the textbox will grow to be unusually long which looks weird. To wrap your sentences down a line, use <cr> just as discussed before. NPC dialogue boxes at most will grow to four (4) lines in height before they begin to look unnatural and wrong. Even then, I'd personally keep it capped to three (3) lines with four (4) line boxes not being as common.
Also, of course, you end the Function with a ret OPcode, or else the script in this case will continue to bleed into Function 400 and run from there.
If you are using a Console instead of an NPC, there are a different steps to it. Firstly, a Console will not cancel actions like an NPC would. If a player talks through the dialogue a Console in CCA without a way of canceling their actions, the player would be able to freely move around, attack and cast techniques while the Console's dialogue is running. In order to prevent this, you want to create a new Function number in your Script somewhere for the Console to target. Using Function 800 randomly as an example. In Function 800, you will want these POcodes in it:
disable_movement2
p_action_disable
ret
disable_movement2 uses a Register to work. You will stick it to R250. Remember your Reserved Registers. R250 is the player slot number so it will automatically work on the player that interacts with it. p_action_disable makes it so players cannot attack or cast techniques. They will stick be able to menu and change gear.
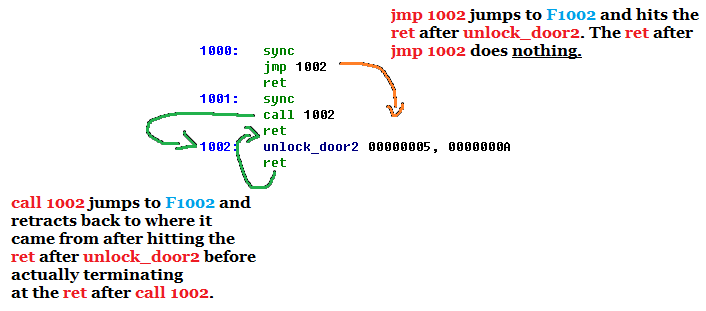
When you go into the params menu of a Console, you will notice the field that asks for the Function. The very first thing you will put in whatever Function you tie the Console to is the call OPcode. Just like the NPC, the Console will target Function 70. The first thing you will put in Function 70 is call 800 to stop the player from moving, attacking, or casting so Function 70 can proceed without janky results. Unlike using jmp or jmpi_=, the call OPcode will return back to where it was sent from upon encountering a ret.
When dialogue is being dispensed from a Console, the OPcode used for message box is also different. Instead of using message, window_msg is used which only takes a single field instead of 2. add_msg works on adding additional message boxes just as well with this OPcode. The close the message box with a window_msg, the winend OPcode is used. Unlike NPC dialogue boxes, Window Messages are more flexible with how long you can make sentences. It's also not out of the realm of abnormality to have too many lines of dialogue in these as it looks more natural. Be sure that then you close the message box that you enable movement and attacks again!
enable_movement2
p_action_enable
ret
^ You can add these at the end of the Console's Function OR have them in another Function somewhere, say F801, and have a call for 801 to enable movement/attacks that way. NPCs do not require these disables/enables as they do it natively when spoken to. Consoles on the other hand will always require them.
In an earlier chapter, it was mentioned that using switch_call or switch_jmp can be used to make it so every player needs to speak and engage a Console to start a quest. While I do not personally use this method of quest initiation anymore, this is what it looks like to Console start with all players + add a timer. This was some saved image of mine for reference that came from one of my quests. This is not taken from the example quest this thread has been using. Feel free to copy as many images from this thread for your own purposes.
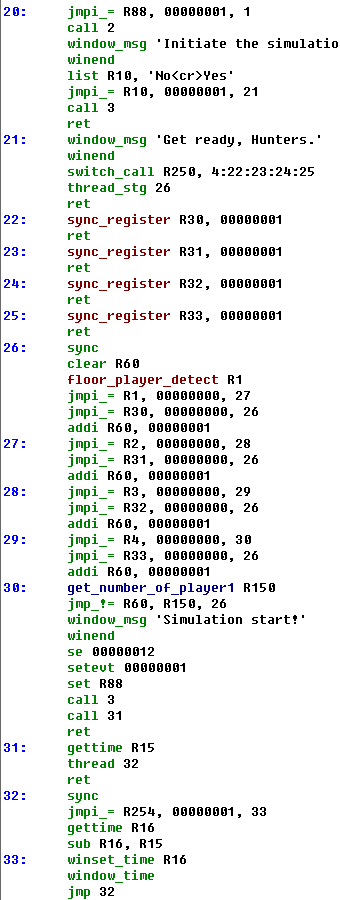
^ Out of this image does come a few important OPcodes that should be highlighted before closing this chapter.
sync_register - This OPcode when tripped will tell ALL clients that a Register has been updated to some value. Even if one split client trips it, it'll send info to other clients.
get_number_of_player1 - Sets a Register when encountered. You can make certain conditions happen with this OPcode based on player count. In Scarlet Realm #3, there is a room where its middle portion is sectioned by laser fences with another laser fence dividing that section in half. If soloing, only one warp is there and not all spawns are present. In 2P+ gameplay, both warps are there and all spawns are there. This is the OPcode that allows things like that to happen. This OPcode also sets from Registers 1-4 instead of 0-3.
addi - This OPcode adds +1 to a designated Register each time it is encountered. In Penumbral Surge #3, there is a laser fence that pulls the party down the mountain two (2) times. After being tripped twice it changes mechanics. This is the OPcode that does that. There are other similar codes that are used to subtract, divide, multiply, etc.
set - Sets a designated Register to 1 when encountered.
clear - Wipes a designated Register back to 0 when encountered.
Don't worry too much if this is getting difficult to digest. After your first or second quest, this will likely all settle in. A good practice is to keep making dummy quests so you have experience putting OPcodes in. It'll help solidify them in your mind after a little while. There are some that you will certainly be using more than others.
message
add_msg
mesend
Step 1: Place an NPC.
Step 2: Click the NPC and click "Edit" or double click the NPC's marker and the same menu will pop up. You'll see a number of things in here but the target focus will be the "Character ID" and the "Function" parameters. For the Character ID, you want to put any number to tie to the the message OPcode. This number must be at least 100 or the NPC will perform a 'Stutter'. For the Function parameter, you want to put in the Function Number in your script that the NPC will target when spoken to.
Step 3: In the Edit for the message OPcode. You can change between HEX, DEC, and Float in the OPcode command window. DEC is the easiest to follow for most. In the image below, it illustrates that the message OPcode is being used on Function 70. The first field (T_DWORD) will be the Character ID of the NPC. In this case, it's 100. The second field (T_STR) is dialogue for the NPC to say.
add_msg follows after message and serves as continuation to an NPC's dialogue. message is only used once and add_msg will continue onward until mesend closes the dialogue box. If sentences run on for too long, the textbox will grow to be unusually long which looks weird. To wrap your sentences down a line, use <cr> just as discussed before. NPC dialogue boxes at most will grow to four (4) lines in height before they begin to look unnatural and wrong. Even then, I'd personally keep it capped to three (3) lines with four (4) line boxes not being as common.
Also, of course, you end the Function with a ret OPcode, or else the script in this case will continue to bleed into Function 400 and run from there.

If you are using a Console instead of an NPC, there are a different steps to it. Firstly, a Console will not cancel actions like an NPC would. If a player talks through the dialogue a Console in CCA without a way of canceling their actions, the player would be able to freely move around, attack and cast techniques while the Console's dialogue is running. In order to prevent this, you want to create a new Function number in your Script somewhere for the Console to target. Using Function 800 randomly as an example. In Function 800, you will want these POcodes in it:
disable_movement2
p_action_disable
ret
disable_movement2 uses a Register to work. You will stick it to R250. Remember your Reserved Registers. R250 is the player slot number so it will automatically work on the player that interacts with it. p_action_disable makes it so players cannot attack or cast techniques. They will stick be able to menu and change gear.
When you go into the params menu of a Console, you will notice the field that asks for the Function. The very first thing you will put in whatever Function you tie the Console to is the call OPcode. Just like the NPC, the Console will target Function 70. The first thing you will put in Function 70 is call 800 to stop the player from moving, attacking, or casting so Function 70 can proceed without janky results. Unlike using jmp or jmpi_=, the call OPcode will return back to where it was sent from upon encountering a ret.

When dialogue is being dispensed from a Console, the OPcode used for message box is also different. Instead of using message, window_msg is used which only takes a single field instead of 2. add_msg works on adding additional message boxes just as well with this OPcode. The close the message box with a window_msg, the winend OPcode is used. Unlike NPC dialogue boxes, Window Messages are more flexible with how long you can make sentences. It's also not out of the realm of abnormality to have too many lines of dialogue in these as it looks more natural. Be sure that then you close the message box that you enable movement and attacks again!
enable_movement2
p_action_enable
ret
^ You can add these at the end of the Console's Function OR have them in another Function somewhere, say F801, and have a call for 801 to enable movement/attacks that way. NPCs do not require these disables/enables as they do it natively when spoken to. Consoles on the other hand will always require them.
In an earlier chapter, it was mentioned that using switch_call or switch_jmp can be used to make it so every player needs to speak and engage a Console to start a quest. While I do not personally use this method of quest initiation anymore, this is what it looks like to Console start with all players + add a timer. This was some saved image of mine for reference that came from one of my quests. This is not taken from the example quest this thread has been using. Feel free to copy as many images from this thread for your own purposes.

^ Out of this image does come a few important OPcodes that should be highlighted before closing this chapter.
sync_register - This OPcode when tripped will tell ALL clients that a Register has been updated to some value. Even if one split client trips it, it'll send info to other clients.
get_number_of_player1 - Sets a Register when encountered. You can make certain conditions happen with this OPcode based on player count. In Scarlet Realm #3, there is a room where its middle portion is sectioned by laser fences with another laser fence dividing that section in half. If soloing, only one warp is there and not all spawns are present. In 2P+ gameplay, both warps are there and all spawns are there. This is the OPcode that allows things like that to happen. This OPcode also sets from Registers 1-4 instead of 0-3.
addi - This OPcode adds +1 to a designated Register each time it is encountered. In Penumbral Surge #3, there is a laser fence that pulls the party down the mountain two (2) times. After being tripped twice it changes mechanics. This is the OPcode that does that. There are other similar codes that are used to subtract, divide, multiply, etc.
set - Sets a designated Register to 1 when encountered.
clear - Wipes a designated Register back to 0 when encountered.
Don't worry too much if this is getting difficult to digest. After your first or second quest, this will likely all settle in. A good practice is to keep making dummy quests so you have experience putting OPcodes in. It'll help solidify them in your mind after a little while. There are some that you will certainly be using more than others.
Post 1/???
This post has maxed out on attachments and will continue chapters on a separate post.
Attachments
Last edited:


